Following the previous post in the series about WPE where we talked about the WPE components, this post will explain briefly the WPE graphics architecture, and how the engine is able to render HTML content into the display. If you haven’t read the previous entries in this blog post series about WPE, we recommend you to start with the first post in the series for an introduction, and then come back to this.
DOM + CSS = RenderTree
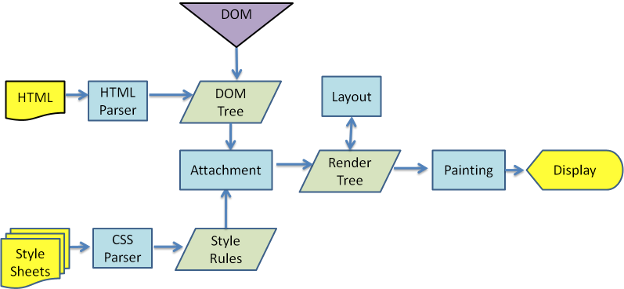
As the document is parsed, it will begin building the DOM tree and load-blocking CSS resources. At some point, possibly before the entire DOM tree is built, it’s time to draw things on the screen. The first step to render the content of a page is to perform what’s called the attachment, which is merging the DOM tree with the CSS rules, in order to create the RenderTree. This RenderTree is a collection of RenderObjects, structured into a tree, and each of these RenderObjects represent the elements in the DOM tree that have visual output. RenderObjects have the capability to render the associated DOM tree node into a surface by using the GraphicsContext class (in the case of WPE, this GraphicsContext uses Cairo to perform the rendering).
Once the RenderTree is created, the layout is performed, ensuring that each of the RenderObjects have their proper size and position set.
It would be possible to render the content of the web page just traversing this RenderTree and painting each of the RenderObjects, but there would be problems when rendering elements that overlap each other, because the order of the elements in the RenderTree doesn’t necessarily match the order in which they must be painted in order to get the appropriate result. For example, an element with a big z-index value should be painted last, no matter its position in the RenderTree.
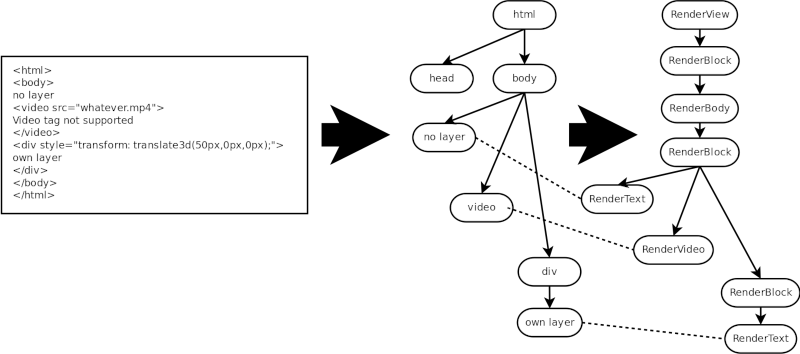
This is an example of how some HTML content is translated into the RenderTree (there are some RenderObjects missing here that are not relevant for the explanation).
RenderLayers
In order to ensure that the elements of the RenderTree are rendered in the appropriate order, the concept of RenderLayer is added. A RenderLayer represents a layer in the document containing some elements that have to be rendered at the same depth (even though this is not exactly the case, you can think of each RenderLayer as a group of RenderObjects that are at a certain z-index). Each RenderObject is associated to a RenderLayer either directly or indirectly via an ancestor RenderObject.
RenderLayers are grouped into a tree, which is called the RenderLayer tree, and RenderLayer children are sorted into two lists: those that are below the RenderLayer, and those that are above. With this we have a structure that has grouped all the RenderObjects that have to be rendered together: they will be on top of the content that has been rendered by the RenderLayers below this one, and below the content rendered by the RenderLayers over this one.
There are several conditions that can decide whether a RenderLayer is needed for some element, it doesn’t necessarily needs to be due to the usage of z-index. It can be required due to transparency, CSS filters, overflow, transformations, and so on.
Continuing with the example, these are RenderLayers that we would get for that HTML code:
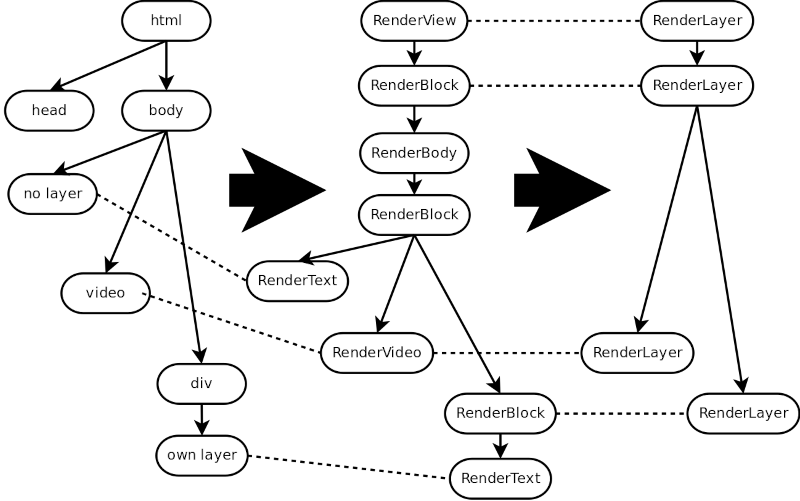
We can see that there are four RenderLayers:
- The root one, corresponding to the RenderView element. This is mandatory.
- Another one corresponding to the first RenderBlock.
- One corresponding to the RenderVideo element, because video elements always get their own RenderLayer.
- One corresponding to the transformed RenderBlock.
RenderLayers have a paint method that is able to paint all the RenderObjects associated to the layer into a GraphicsContext (as mentioned, WPE uses Cairo for this). As in the previous case, it’s possible to paint the content of the page at this point just by traversing the RenderLayer tree and requesting the RenderLayers to paint their content, but in this case the result will be the correct one. Actually this is what WebKitGTK does when it’s run with accelerated compositing disabled.
Layer composition
While with the previous step we are already able to render the page contents, this approach is not very efficient, especially when the page contains animations, elements with transparency, etc. This is because in order to paint a single pixel, all the RenderLayers need to be traversed, and those that are contributing to that pixel need to be repainted (totally or partially), even if the content of those RenderLayers hasn’t changed. For example, think about an animation that’s moving an element. For each frame of that animation, the animated element needs to be repainted, but the area that was covered by the animated element in the last frame needs to be repainted as well. The same happens if there’s a translucent element on top of other content. If the translucent element changes, it needs to be repainted, but the content below the translucent element needs to be repainted as well because the blend needs to be performed again.
This would be much more efficient if the content that doesn’t change was somehow separated from the content that’s changing, and we could render those two types of content separately. This is where the composition stage comes into action.
The idea here is that we’re going to paint the RenderLayer contents into intermediate buffers, and then compose those buffers one on top of the other to get the final result. This last step is what we call composition. And it fixes the problems we mentioned with animations of transparency: animations don’t require repainting several RenderLayers. Actually moving an element just means painting one buffer with an offset during the composition. And for transparency, we just need to perform the new blending of the two buffers during the composition, but the RenderLayers of the content below the translucent element don’t need to be repainted.
Once we have the RenderLayer tree, we could just paint each RenderLayer in its own buffer in order to perform the composition. But this would be a waste of memory, as not every RenderLayer needs a buffer. We introduce here a new component, the GraphicsLayer.
GraphicsLayers are a structure used to group those RenderLayers that will render into the same buffer, and it will also contain all the information required to perform the composition of these buffers. A RenderLayer may have a GraphicsLayer associated to it if it requires its own buffer to render. Otherwise, it will render into an ancestor’s buffer (specifically, the first ancestor that has a GraphicsLayer). As usual, GraphicsLayers are structured into a tree.
This is how the example code would be translated into GraphicsLayers.

We can see that we have now three GraphicsLayers:
- The root one, which is mandatory. It belongs to the RenderView element, but the first RenderBlock will render into this GraphicsLayer's buffer as well.
- The one for the RenderVideo element, as videos are updated independently from the rest of the content.
- The one for the transformed element, as the transformed elements are updated independently from the rest of the content.
With this structure, now we can render the intermediate buffers of the RenderView and the transformed RenderBlock, and we don’t need to update them any more. For each frame, those buffers will be composited together with the RenderVideo buffer. This RenderVideo will be updating its buffer whenever a new video frame arrives, but it won’t affect the content of the other GraphicsLayers.
So now we have successfully separated the content that is changing and needs to be updated from the content that remains constant and doesn’t need to be repainted anymore, just composited.
Accelerated compositing and threaded accelerated compositing
There’s something else that be done in order to increase the rendering performance, and it’s using the GPU to perform the composition. The GPU is highly optimized to perform operations like the buffer composition that we need to do, as well as handle 3D transforms, blending, etc. We just need to upload the buffers into textures and let the GPU handle the required operations. WPE does this though the usage of the EGL and GLES2 graphics APIs. In order to perform the composition, EGL is used to create a GLES2 EGLContext. Using that context, the intermediate buffers are uploaded to textures, and then those textures are positioned and composited according to their appropriate positions. This leverages the GPU for the composition work, leaving the CPU free to perform other tasks.
This is why this step is called accelerated compositing.
But there’s more.
Until this point, all the steps that are needed to render the content of the page are performed in the main thread. This means that while the main thread is rendering and compositing, it’s not able to perform other tasks, like run JS code.
WPE improves this by using a parallel thread whose only mission is to perform the composition. You can think of it as a thread that runs a loop that composites the incoming buffers using the GPU when there’s content to render. This is what we call threaded accelerated compositing.
This is specially useful when there’s a video or an animation running on the page:
-
If there’s a video running in the page, in the non-threaded case, for each video frame the main thread would need to get the frame and perform the composition with the rest of the page content. In the threaded case, the video element delivers the frames directly to the compositor thread, and requests a composition to be done, without the main thread being involved at all.
-
If there’s an animation, in the non-threaded case, for each frame of the animation the main thread would need to calculate the animation step and then perform the composition of the animated element with the rest of the page content. In the threaded case, the animation is passed to the compositor thread, and the animation steps are calculated on that thread, triggering a composition when needed. The main thread doesn’t need to do anything besides starting the animation.
It would take another post to explain in detail how the threaded accelerated composition is implemented on WPE, but if you’re curious about it, know that WPE uses an specialization of the GraphicsLayer called CoordinatedGraphicsLayer in order to implement this. You can use that as an starting point.
So this is the whole process that’s performed in WPE in order to display the content of a page. We hope it’s useful!
Future
At Igalia we’re constantly evolving and improving WPE, and have ongoing efforts to improve the graphics architecture as well. Besides small optimizations and refactors here and there, the most important goals that we have are:
-
Add a GPU process. Currently the EGL and GLES2 operations are performed in the web process. As there can be several web processes running when several pages are open, this means the browser can be using a lot of EGL contexts in total, which is a waste of memory. Also, all these processes could potentially be affected by errors, leaks, etc., in the code that handles the GPU operations. The idea is to centralize all the GPU operations into a single process, the GPU one, so all the web processes will issue paint requests to the GPU process instead of painting their content themselves. This will reduce the memory usage and improve the software’s robustness.
-
Remove CPU rasterization and paint all the content with GLES2. Using the CPU to paint the layer contents with cairo is expensive, especially in platforms with slow CPUs, as embedded devices sometimes do. Our goal here is to completely remove the cairo rasterization and use GLES2 calls to render the 2D primitives. This will greatly improve the rendering performance.
-
Use ANGLE to perform WebGL operations. WPE currently implements the WebGL 1.0 specification through direct calls to GLES2 methods. We are changing this in order to perform the operations using ANGLE, which will allow WPE to support the WebGL 2.0 specification as well.
But what about the backends?
In the previous post there was a mention of backends that are used to integrate with the underlying platform. How is this relevant to the graphics architecture?
Backends have several missions when it comes to communicate with the platform, but regarding graphics, they have two functions to achieve:
-
Provide a platform dependent surface that WPE will render to. This can be a normal buffer, a Wayland buffer, a native window, or whatever, as long as the system EGL implementation allows creating an
EGLContextto render to it. -
Process WPE indications that a new frame has been rendered, performing whatever tasks are necessary to take that frame to the display. Also notify WPE when that frame was been displayed.
The most common example of this is a Wayland backend, which provides a buffer to WPE for rendering. When WPE has finished rendering the content, it notifies the backend, which sends the buffer to the Wayland compositor, and notifies back to WPE when the frame has been displayed.
So, whatever platform you want to run WPE on, you need to have a backend providing at least these capabilities.
Final thoughts
This was a brief overview of how WPE rendering works, and also what are the major improvements we’re trying to achieve at Igalia. We’re constantly putting in a lot of work to keep WPE the best web engine available for embedded devices.
If this post got you interested in collaborating with WPE development, or you are in need of a web engine to run on your embedded device, feel free to contact us. We’ll be pleased to help!
We also have open positions at the WebKit team at Igalia. If you’re motivated by this field and you’re interested in developing your career around it, you can apply here!
Miguel has been contributing to WebKit and WPE for almost ten years now, focusing specially on the graphics part of the code.